|
|
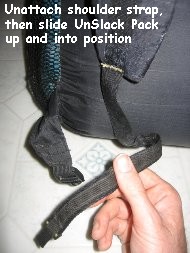
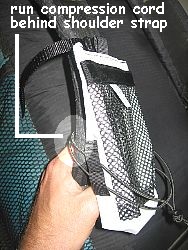
UnSlack Pack easy 1-2-3 set-up instructions G (1) UnSlack Pack is designed to be worn on a backpack's shoulder strap at a comfortable position, allowing easy access to the item's contents while wearing the backpack. To determine the correct position, wear your backpack normally loaded and adjust the shoulder straps to an optimal tension as needed. Usually the preferred shoulder strap for UnSlack Pack will be the one you first climb into when donning your backpack. Place UnSlack Pack in front of this shoulder strap to determine a suitable height: high enough to clear the underarm portion of the shoulder strap, yet low enough for easy access. UnSlack Pack will hang from its top-rear tab, with the length of flat webbing running in a loop around the shoulder strap's girth (or elsewhere - see "Alternative Mounting Options" below). Note the height on the shoulder strap where this tab should rest. A(2) Now take off the backpack and unattach the lower end of this shoulder strap from the backpack via its ladder-lock buckle, if so equipped. (Otherwise, if you cannot undo the shoulder strap then detach the loop of webbing and length of compression cord from UnSlack Pack, place the item in position, then re-attach the webbing and cord.) Slide UnSlack Pack up the shoulder strap, with the flat webbing looped around the shoulder strap, and two loops of compression cord running behind the shoulder strap. With the item in position, tension the webbing loop around the shoulder strap. Proper tension is just enough to slightly deform the edges of the shoulder strap; a light tug on UnSlack Pack should not allow the item to slip from its anchored position. B
(3)
Re-attach the backpack's
shoulder strap and fully loosen UnSlack Pack's compression cord via
its cordlock. Now place your camera (and/or other items) into UnSlack
Pack, close the top, and re-tighten the compression cord. (Tension should
be fairly high, and even, among the two loops.) Lastly, put the backpack
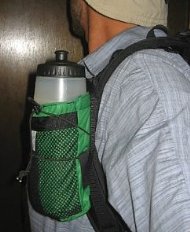
on again and test UnSlack Pack once more to make sure it fits as desired.
Properly positioned and tensioned, UnSlack Pack and its contents will
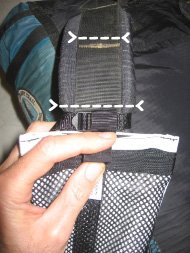
be held firmly in place, irrespective of the wearer's movements. Alternative mounting options If your backpack's shoulder straps do not offer enough resistance to hold UnSlack Pack in tension while wearing the backpack, you can just as easily run UnSlack Pack's webbing loop instead around your shoulder strap's top-stitched webbing, if so equipped (see 4th image at left). Often this top-stitched webbing offers various horizontal stops - at the stitch points - and you can successfully anchor UnSlack Pack directly above one of these stops. Run UnSlack Pack's webbing around the shoulder strap's webbing, tension it, and allow it to rest just above the stitching. (Run the compression cord behind the shoulder strap as normal.) You can also attach UnSlack Pack to a shoulder strap's "D Ring" or above a tri-glide buckle if so equipped. UnSlack Pack can also be attached horizontally to a backpack hipbelt. Keep the contents well tensioned and make sure the snap / Velcro top is fully closed, especially when unclipping the hipbelt. (For installation on wider hipbelts more than 8" in circumference, we recommend using a Hipbelt Kit, sold separately through our website: www.simblissity.net) Note, too, that
the compression cord can be routed in a number of configurations in
order to provide optimal compression of the load. Both loops of cord
can run through the dual-position guides on either side of the UnSlack
Pack, as usual. Or run only one loop through either guide position,
and cinch the cord lock instead higher on UnSlack Pack - through the
mesh pocket's drawstring loop - when storing taller, heavier items. Helpful Tips
|